
In summary:
- Success on the Skyline Trail hinges on strategic, data-driven decisions, not just physical endurance.
- Master food packing by targeting a minimum of 125-135 calories per ounce to keep pack weight manageable.
- Campsite selection is a strategic trade-off between views, wind exposure, and proximity to The Notch.
- Use a strict, observable Go/No-Go framework to make objective safety decisions at The Notch, especially in deteriorating weather.
- Bear safety is a protocol, not a feeling. Carry spray on your person, know the species-specific responses, and maintain a bare campsite.
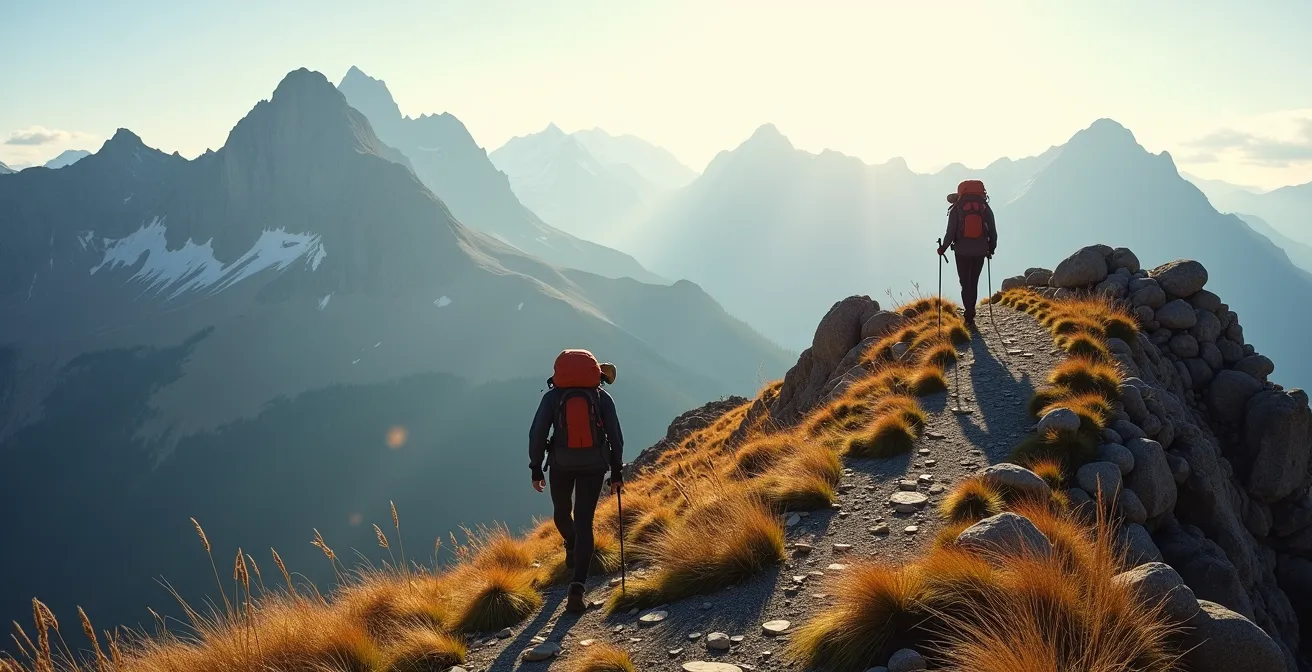
The Skyline Trail in Jasper National Park is an icon of the Canadian Rockies, a 44-kilometre traverse that spends most of its length above the treeline. For the experienced hiker, its allure is undeniable: vast, sweeping vistas of the Maligne Range and the promise of true alpine wilderness. Most guides will tell you the obvious: book early, pack layers, and be “bear aware.” But for a trek of this calibre, such advice is merely the entry fee. Surviving—and truly thriving—on the Skyline isn’t about following a simple checklist; it’s a game of strategic planning and critical, in-the-moment decisions.
The common approach focuses on logistics, but the real challenge lies in the trade-offs. It’s about understanding the specific caloric density of your food, not just packing “light.” It’s about weighing the strategic advantage of a campsite’s view against its exposure to punishing winds. This guide moves beyond the what and dives deep into the why and how. We will not talk about just being prepared for a storm at The Notch; we will provide a clear decision-making framework for when to turn back. We will replace the generic “Leave No Trace” mantra with the hard science of alpine lake ecology.
This article is built as a series of strategic briefings, transforming your hike from a physical test into a masterclass in backcountry decision-making. We will cover the quantitative science of food packing, the tactical choice of campsites, non-negotiable safety protocols for wildlife and weather, and the systems required to stay warm when temperatures swing over 25 degrees in a single day. Prepare to plan the Skyline Trail not just as a hiker, but as an expedition strategist.
This comprehensive guide breaks down the critical decisions you’ll face on the trail. Below, the summary outlines the key strategic areas we’ll cover, from pre-trip planning to on-trail risk management, ensuring you have the expert knowledge to tackle this world-class hike.
Summary: The Skyline Trail: A Strategic Planning Guide
- Calories per Gram: How to Pack Food for 3 Days Without Breaking Your Back?
- Snowbowl vs Tekarra: Which Skyline Campsites Offer the Best Views?
- Canister vs Hang: What is Required for Food Storage in the Backcountry?
- The Notch in a Storm: When Should You Turn Back on the Skyline?
- Bathing in Lakes: Why You Should Not Use Soap Even if It’s Biodegradable?
- How to Dig a Cathole: The Sanitary Rules for Backcountry Toilet Needs
- Bear Spray vs Bells: What Actually Keeps You Safe on Short Nature Walks?
- How to Pack for a Day Hike That Starts at 20°C and Ends at -5°C?
Calories per Gram: How to Pack Food for 3 Days Without Breaking Your Back?
On a multi-day, high-altitude trek like the Skyline, your food is not just sustenance; it’s a critical component of your energy system and a major factor in pack weight. Experienced hikers know to pack light, but experts quantify it. The governing principle is caloric efficiency, measured in calories per ounce (cal/oz) or gram. Your goal should be to select foods that offer a minimum of 125-135 calories per ounce. Anything less is inefficient weight.
A successful food strategy involves meticulous planning around macronutrient ratios, which should change daily. For a typical 3-day itinerary, consider this framework:
- Day 1: Front-load complex carbohydrates to build glycogen reserves for the initial climb. Aim for a ratio of approximately 45% carbs, 35% fats, and 20% protein.
- Day 2: This is your high-exertion day, likely crossing The Notch. Increase fat intake for sustained, slow-burn energy. A 40% carb, 40% fat, 20% protein split is effective.
- Day 3: Combat depletion and prevent “bonking” on the long descent. Prioritize fats, the most calorie-dense fuel source. A ratio of 35% carbs, 45% fats, and 20% protein will provide the necessary endurance.
To put this into practice, think locally before you arrive. The town of Jasper is an excellent resource. One effective strategy involves sourcing high-density items right in town. For example, Bear’s Paw Bakery offers trail bars that can exceed 140 cal/oz. Local outfitters stock Canadian dehydrated meal brands like Happy Yak (averaging 130 cal/oz) and Backcountry Wok (125 cal/oz), which are specifically designed for this kind of efficiency. By strictly selecting items with a minimum 120 cal/oz density, it’s possible to carry all food for a 3-day, 3,500-calorie/day trip for under 4.5 kg, keeping total pack weight below the comfortable 18 kg threshold.
Snowbowl vs Tekarra: Which Skyline Campsites Offer the Best Views?
The choice of where to sleep on the Skyline Trail is a major strategic decision that dictates the rhythm of your hike and your experience with its most iconic landscapes. The two most sought-after campsites for a classic two-night itinerary are Snowbowl (12.2 km) and Tekarra (30.5 km). Choosing between them—or opting for an alternative like Little Shovel (8.3 km)—is a trade-off between views, exposure, and logistics. There is no single “best” answer; there is only the best choice for your specific goals.
Tekarra is often lauded for its spectacular, east-facing position on an exposed ridge, offering unparalleled sunrise views over the Maligne Range. However, this prime location comes at a cost: it is highly exposed to wind, and its water source can become unreliable later in the season. Snowbowl, nestled in a west-facing basin, provides better shelter from the wind and is renowned for excellent sunsets. Its location 10 km before The Notch makes for a longer, more demanding second day. The data below breaks down the key decision factors.
This comparison from a detailed trail analysis helps visualize the strategic trade-offs.
| Factor | Snowbowl (12.2 km) | Tekarra (30.5 km) | Little Shovel (8.3 km) |
|---|---|---|---|
| Sunrise/Sunset Views | Excellent sunset west-facing | Outstanding sunrise east-facing | Limited – in trees |
| Wind Exposure | Moderate – some shelter | High – exposed ridge location | Low – protected forest |
| Water Reliability (August) | Good – snowmelt stream | Variable – may dry up | Excellent – creek nearby |
| Proximity to Notch | 10 km before | 5 km after | 15 km before |
| Booking Difficulty | Very High – books in minutes | High – popular choice | Moderate – often available |
Your choice has significant implications. Booking Tekarra means you tackle The Notch on Day 2 with a lighter pack but face a tougher first day. Choosing Snowbowl gives you a shorter first day but means carrying a heavier pack over the trail’s highest point. Both sites are notoriously difficult to book, often filling up within minutes of the reservation system opening. A viable backup is Little Shovel, which is more protected and often has more availability, but it offers limited views and sets you up for a much longer journey to the summit.
Canister vs Hang: What is Required for Food Storage in the Backcountry?
In Jasper National Park, food storage is not a recommendation; it is a strict, non-negotiable regulation designed to protect both hikers and the resident bear population. The Skyline Trail operates on a “bare campsite” protocol. This means that anything with a scent—from your gorp to your toothpaste, sunscreen, and medication—must be stored in designated bear-proof facilities. Failure to comply can lead to a “habituated” bear, which is often a death sentence for the animal.
For most of the Skyline Trail, the required system is straightforward. The primary campsites, including Snowbowl and Little Shovel, are equipped with communal metal bear lockers. Your only task is to ensure every single scented item is secured inside whenever you are not actively using it. The cooking areas with picnic tables are designated for a reason; they consolidate food odours away from tenting pads. You must cook and eat exclusively in these areas and maintain a minimum 100-meter distance between your kitchen setup and your tent.
The situation at Tekarra campground, located at the timberline, is slightly different. While lockers are available, its popularity during peak season can lead to them being full. For this reason, experienced hikers often carry a personal bear canister as a reliable backup when staying at Tekarra. Bear hangs are not a practical or permitted solution on the Skyline Trail due to the lack of suitable trees in the alpine and subalpine environments. The data confirms the effectiveness of these measures; an analysis of hundreds of trip reports shows that while grizzly sightings occur, strict 100% compliance with food storage prevents all negative incidents.
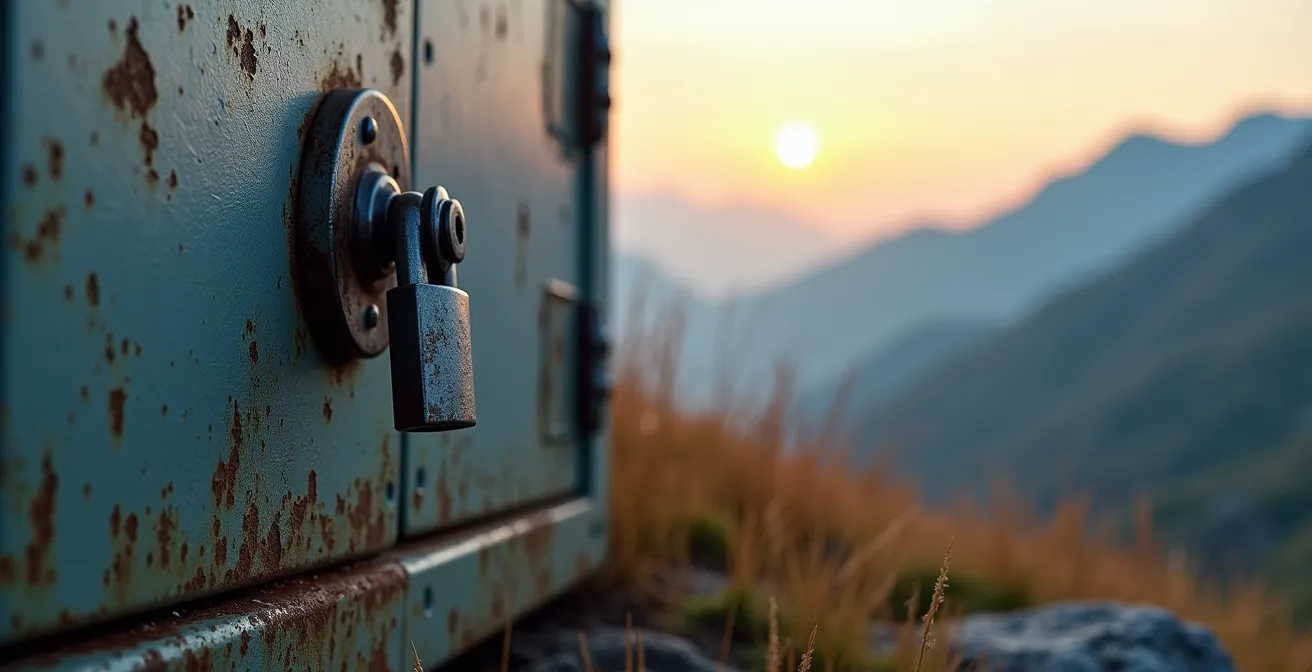
The image above shows a typical bear locker found at Skyline campsites. These heavy-duty containers are your most important tool for wildlife coexistence. Using them is not just a rule; it is your responsibility as a visitor in their home. Think of it this way: your scent discipline directly contributes to keeping Jasper’s bears wild and safe.
The Notch in a Storm: When Should You Turn Back on the Skyline?
The Notch is the crux of the Skyline Trail. At 2,511 meters, it is the highest point of the hike and a notorious weather-catcher. A steep, scree-filled scramble, it is challenging in perfect conditions and downright dangerous in a storm. The most critical decision you will make on the entire trail is the “Go/No-Go” call as you approach this col. An incorrect decision here can have severe consequences, as a Parks Canada rescue in August 2021 tragically highlighted. A group became hypothermic and disoriented in a sudden snow squall, requiring extraction after attempting The Notch in deteriorating weather. The key to safety is removing emotion and ego from the equation and relying on an objective decision framework.
Do not rely on “gut feelings.” Use a systematic check based on observable conditions. If the answer to any of the key questions in the framework below is “No” or points towards turning back, the decision is made for you. Arguing with the mountain is a battle you will lose.
Your Go/No-Go Decision Checklist for The Notch
- Wind Speed Check: Are you struggling to stand upright or maintain your balance against the gusts? Can you hear your hiking partner speaking from 5 meters away? If not, turn back.
- Visibility Test: Can you clearly see the trail on the opposite side of The Notch col? If the route is obscured by cloud, fog, or precipitation, turn back.
- Precipitation Type Analysis: Rain is manageable with proper hardshell gear. However, the moment any form of frozen precipitation—hail, sleet, graupel, or snow—begins to fall, you must turn back immediately.
- Time Assessment: Is it past 2 PM? Afternoon thunderstorms build rapidly in the Rockies. If the weather is unstable and you are not yet at the summit of The Notch by 2 PM, turning back is the wisest course of action. This is your firm turnaround time.
- Group Morale & Condition Check: Is any member of your party expressing serious concern, fear, or showing signs of hypothermia (e.g., shivering, confusion, fumbling)? Your group is only as strong as its most vulnerable member. Turn back without debate.
As the 2021 rescue operation demonstrated, whiteout conditions can develop in minutes at this altitude, reducing visibility to less than 10 meters. The Notch is not a place for summit fever. It demands respect and a conservative approach. Being able to say “not today” is the mark of an expert mountaineer, not a failure.
Bathing in Lakes: Why You Should Not Use Soap Even if It’s Biodegradable?
After a long day on the trail, the idea of a refreshing dip in a crystal-clear alpine lake is tempting. A quick “polar plunge” is generally acceptable, but the introduction of any foreign substance—especially soap—is an act with serious ecological consequences. Many well-intentioned hikers believe that using “biodegradable” or “natural” soap is harmless. This is a critical misunderstanding of alpine ecosystems.
The term “biodegradable” simply means the product will break down with the help of bacteria found in healthy soil. Alpine lakes, however, are often glacially fed and sit on sterile rock. They lack the volume of soil and the specific microorganisms needed to process these substances. Phosphates and other chemicals found even in biodegradable soaps can trigger algal blooms, starving the water of oxygen and harming the delicate organisms that live within it. According to Parks Canada environmental research, glacially-fed alpine lakes above 2,000 meters can take 15-20 years to recover from a single significant phosphate contamination event.
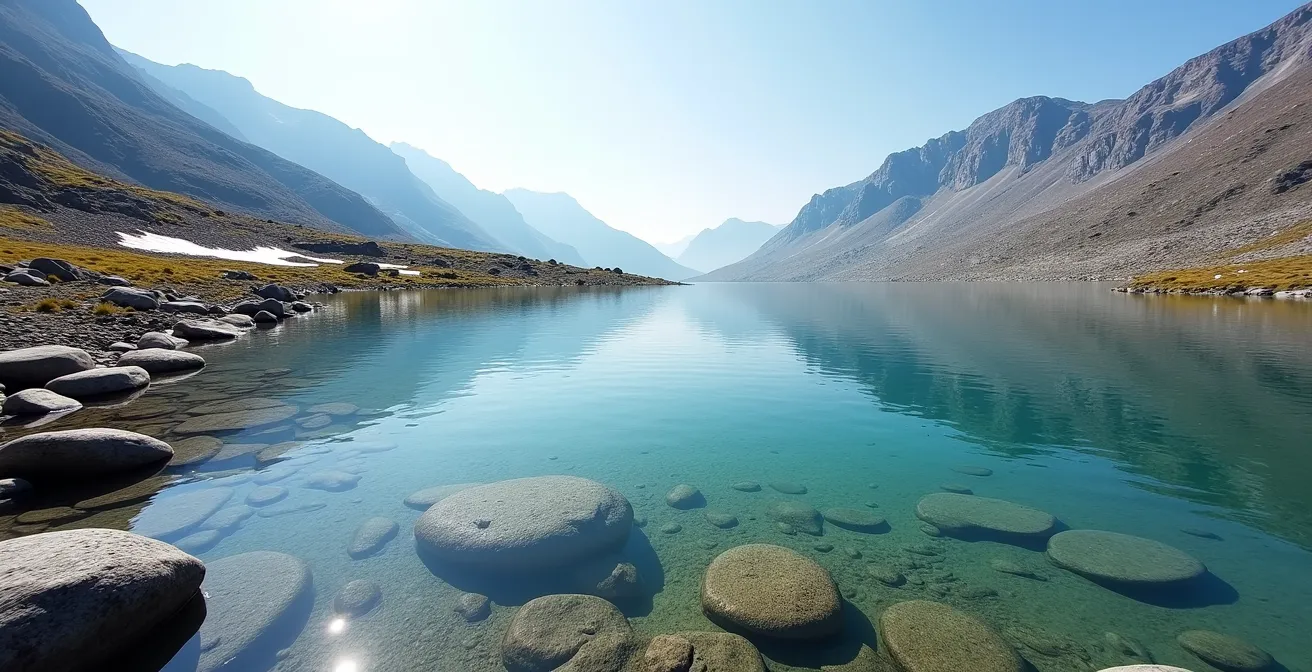
When you look at a pristine lake like the one pictured, you are looking at an ecosystem in perfect, delicate balance. Your responsibility is to leave it exactly as you found it. This includes not just soap and shampoo, but also sunscreen and insect repellent, which should be washed off away from any water source. If you must wash, you must use a proper Leave No Trace system:
- Collect water in a collapsible bucket or pot.
- Carry the water at least 70 meters (200 feet) away from the lake or any stream.
- Use only a few drops of biodegradable soap, if absolutely necessary, for your wash.
- Scatter the resulting grey water over a wide area of gravel or thick vegetation, allowing the soil to act as a filter.
How to Dig a Cathole: The Sanitary Rules for Backcountry Toilet Needs
Managing human waste in the backcountry is a matter of public health and environmental protection. While not a glamorous topic, understanding the correct protocol is the duty of every hiker. On the Skyline Trail, the rules are dictated by your location and the terrain, with a strong emphasis on using the provided infrastructure wherever possible.
The first and most important rule is that at all six designated campgrounds on the Skyline Trail, you must exclusively use the provided pit toilets or privies. Parks Canada has invested in modern composting toilet systems that are remarkably effective, even at high elevations. A case study on their implementation showed a 95% reduction in environmental impact compared to the previous reliance on dispersed catholes. These privies are there for a reason; digging a cathole in or near a campground is a major health hazard that contaminates the area for all future visitors.
For emergency situations between campgrounds, the protocol changes with the elevation:
- Below the treeline: If you are in a forested area with deep soil, you may dig a cathole. It must be a minimum of 70 meters (200 feet) from any water source, trail, or campsite. Use an ultralight trowel to dig a hole 6-8 inches deep. After use, backfill the hole completely and disguise it with natural materials.
- Above the treeline: Along the exposed alpine ridges of the Skyline, the soil is thin, rocky, and fragile. Digging a proper cathole is often impossible. In these areas, you are required to use WAG (Waste Alleviation and Gelling) bags. These are portable toilet kits that allow you to pack out your solid waste safely and hygienically.
- Toilet Paper: In Jasper’s dry climate, toilet paper decomposes extremely slowly. It must never be buried. All used toilet paper must be packed out in a sealed bag (a double Ziploc system works well).
Bear Spray vs Bells: What Actually Keeps You Safe on Short Nature Walks?
The presence of both grizzly and black bears in the Maligne Range is a reality of hiking the Skyline Trail. Effective bear safety is not about eliminating risk, but about managing it through proven protocols. The long-standing debate between bear bells and bear spray has a clear, data-driven winner. Bear bells are passive and largely ineffective; some studies even suggest they can attract curious bears. Your voice is a far better deterrent. Regularly calling out “Hey Bear!”—especially before blind corners or in dense brush—is the most effective way to announce your presence and avoid a surprise encounter.
Bear spray, on the other hand, is an active deterrent and your last line of defense. It is not a repellent to be sprayed on gear; it is a tool to be deployed directly at an aggressive, charging bear. When used correctly, it is incredibly effective. A comprehensive study of Rocky Mountain bear incidents found that bear spray stops aggressive behavior in 92% of encounters. However, it is only useful if you can access it in seconds. This requires a specific carry protocol:
- Carry your spray in a holster on your pack’s hip belt or a chest harness. Never carry it inside your pack.
- Practice drawing the canister and removing the safety clip with one hand until it becomes muscle memory.
- Only deploy the spray when a bear is approaching and is within the effective range of 7-10 meters.
- Aim slightly downward toward the charging bear’s face, as the spray cloud will rise. The goal is to create a wall of atomized capsaicin between you and the animal.
Expert-level safety also involves knowing how to react based on the species and its behavior. The Skyline hosts both. A key case study from 2023 illustrates the difference: a hiker defused a defensive encounter with a grizzly sow and cubs by standing their ground and speaking calmly. Conversely, a predatory black bear had to be deterred with aggressive yelling and thrown objects. Know the key identifiers: grizzlies have a prominent shoulder hump and a dished facial profile, while black bears have a straight “Roman nose” profile and taller ears. Your response to a charge differs: never run from either, but be aware that grizzlies often bluff charge, whereas predatory black bears rarely do.
Key Takeaways
- Plan your food not by weight, but by caloric density, targeting at least 125 cal/oz to optimize your energy system.
- Choose your campsite as a strategic trade-off: Tekarra for sunrise views and high exposure, Snowbowl for sunset and better shelter.
- The decision to cross The Notch in bad weather must be objective. Use a Go/No-Go checklist based on wind, visibility, and time.
How to Pack for a Day Hike That Starts at 20°C and Ends at -5°C?
The weather on the Skyline Trail is notoriously fickle, defined by extreme temperature swings. It’s entirely possible to start a day’s hike in a t-shirt at 20°C in a sunny valley and end it hours later on an exposed ridge at -5°C with wind-driven snow. Surviving, let alone being comfortable, in these conditions requires a disciplined layering system—not just a random assortment of clothes. Cotton is forbidden; it absorbs moisture and loses all insulating properties, making it a direct path to hypothermia. Your system should be built on performance materials like merino wool and synthetics.
A proper system is composed of distinct layers, each with a specific function.
- Base Layer: This is your second skin. A 150-200 weight merino wool top is ideal. It wicks moisture, regulates temperature, and, critically, stays warm even when damp.
- Active Mid-Layer: This is worn while you are moving in cool conditions. A breathable grid fleece or a lightweight, air-permeable synthetic jacket is perfect. It provides warmth while allowing sweat vapor to escape.
- Static Insulation: This is your high-loft “puffy” jacket (down or synthetic). It should only be worn during stops, at camp, or in extreme cold. Hiking in it will cause you to overheat and sweat, compromising the entire system.
- Shell Layer: A waterproof-breathable hardshell jacket is non-negotiable for protection against the wind and precipitation that are common on the exposed ridges.
- Extremity Protection: Significant heat is lost through your head and hands. Insulated gloves, a warm toque (beanie), and a neck gaiter or buff are critical for preventing frostbite and managing comfort above 2,400 meters.
The choice between merino wool and synthetic fabrics for your layers involves another strategic trade-off, as detailed in the table below. Many experienced hikers use a hybrid system: merino for base layers due to its superior odor resistance and comfort, and synthetics for mid-layers due to their durability and faster drying times.
| Factor | Merino Wool | Synthetic | Winner for Skyline |
|---|---|---|---|
| Odor Resistance | Excellent – 3+ days | Poor – smells after day 1 | Merino |
| Drying Speed | Slow – 4-6 hours | Fast – 1-2 hours | Synthetic |
| Warmth When Wet | Good – retains 80% insulation | Fair – retains 60% insulation | Merino |
| Durability | Fair – prone to holes | Excellent – very durable | Synthetic |
| Temperature Regulation | Excellent – adapts to body temp | Good – consistent performance | Merino |
Your successful completion of the Skyline Trail is the direct result of the dozens of small, intelligent decisions you make before you even set foot on the trailhead. By embracing a strategic, data-driven approach to planning, you elevate yourself from a tourist to a true backcountry expert, capable of handling the unique challenges of this world-class alpine environment. This mindset is your most valuable piece of gear. To put these strategies into practice, your next step is to begin building your detailed gear lists and food plans based on these expert principles.