
Successfully photographing the aurora in Alberta isn’t about chasing the highest Kp-index; it’s about mastering the strategic trade-offs between mediocre activity and perfect conditions.
- Weak but clear auroras (Kp 2-3) often yield better photos than strong auroras clouded by hype and light pollution.
- Your gear’s performance is deeply tied to the cold; -30°C is a challenge for you but an advantage for your camera’s sensor, reducing thermal noise.
Recommendation: Stop waiting for the ‘perfect’ forecast. Instead, focus on finding true darkness and preparing to outlast the cold—that’s where the real magic is captured.
Every aurora chaser in Alberta knows the feeling. The forecast app flashes a Kp 5 alert, a mad scramble for gear ensues, and you drive for hours only to find yourself in a parking lot with a hundred other hopefuls, all pointing their cameras at a faint, washed-out glow. The most common advice—go north, use a tripod, wait for a big solar storm—often leads to frustration. These tips cover the ‘what’, but they completely miss the ‘why’ and ‘how’ that separate a forgettable snapshot from a breathtaking photograph. The truth is, many of the most spectacular aurora images are captured on nights the casual observer stays home.
This guide is for the dedicated hunter, the photographer who wants to move beyond the basics. The best time to see the aurora often falls between September and April, but the secret isn’t just the month; it’s the mindset. We’ll dismantle the myth that you need a major geomagnetic storm to get the shot. What if the key wasn’t a high Kp number, but rather a deep understanding of light purity, your own patience threshold, and the technical dance between your camera’s settings and the brutal, beautiful Alberta cold? This is not another list of generic tips.
We are going to explore a more nuanced approach. We will dissect the art of finding solitude just outside the city glow, even when the forecast is mild. We’ll delve into the precise camera settings that balance light gathering with noise control, and reveal why Alberta’s frigid temperatures can be your secret weapon. We’ll compare iconic dark sky preserves not just for their darkness, but for their compositional potential. Finally, we’ll build the definitive system for not just surviving, but thriving, while waiting for hours in the frozen dark. This is the technical and patience-based strategy for capturing the true soul of Alberta’s skies.
This comprehensive guide is structured to take you from forecasting theory to practical execution. Below is the roadmap for your journey to becoming a master aurora hunter in Alberta.
Summary: Mastering the Art and Science of Alberta’s Northern Lights
- Kp 5 vs Kp 2:How to Find True Solitude in Alberta Without Risky Backcountry Skills?
- ISO 1600 or 3200: How to Capture Auroras Without Grainy Noise?
- Elk Island or Jasper: Which Dark Sky Preserve Offers Better Foreground Views?
- Standing Still at -30°C: The Boots You Need to Wait for the Lights?
- Camera Sensor vs Human Eye: Why Do the Lights Look Greener on Your Screen?
- Morning or Afternoon: When is the Best Light on the Athabasca Glacier?
- Base, Mid, Shell: What is the Correct Layering Sequence for Rockies Hiking?
- Standing Still at -30°C: The Boots You Need to Wait for the Lights?
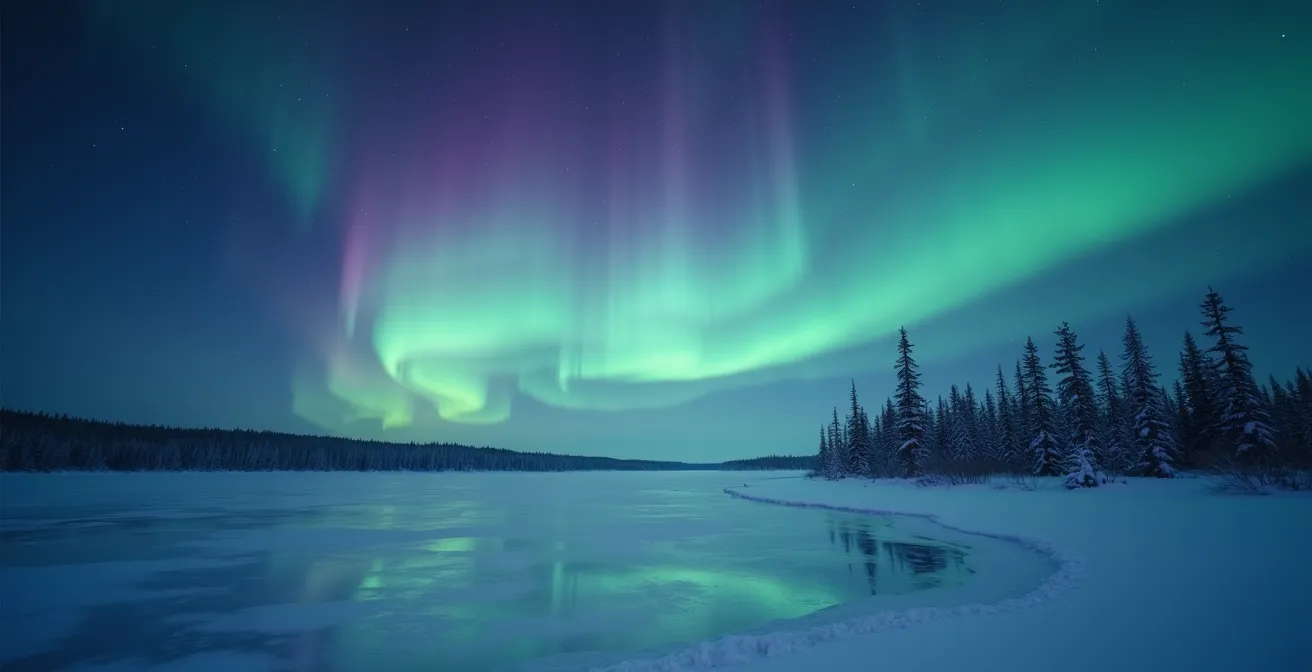
Kp 5 vs Kp 2: How to Find True Solitude in Alberta Without Risky Backcountry Skills?
The biggest misconception in aurora hunting is that a high Kp-index is the only ticket to a great show. While a Kp 5 or 6 storm can be spectacular, it’s also a signal that sends every casual viewer racing to the most popular, light-polluted spots. The result? A battle for parking and a shot ruined by passing headlights. The professional’s secret is embracing the nuance of weaker displays. A Kp 2 or 3 event, often dismissed by amateurs, can produce stunning, detailed auroral bands—if you know where to go and how to look. These quieter nights are your key to true solitude.
Forecasting tools are essential, but they require interpretation. According to the University of Alberta’s AuroraWatch, which uses over 10 years of magnetometer data, alerts are based on local magnetic field activity, providing a more accurate short-term prediction for the Edmonton area than a global Kp-index. The strategy is to use these alerts not as a starting gun, but as a guide. When a mild alert (yellow) is issued, it’s the perfect time to head out. You’ll avoid the crowds while still having a high probability of a beautiful, photogenic display.
So, where do you find this solitude? You don’t need risky backcountry skills. The key is to think like a local photographer. Here are some proven strategies:
- Explore the grid of range roads and township roads north of Edmonton or Calgary. A quick look at a map reveals countless north-facing pull-offs away from major highways.
- Target Provincial Recreation Areas (PRAs) instead of National Parks on lower-activity nights. Spots like Chain Lakes south of Calgary or Whitney Lakes east of Edmonton offer dark skies with fewer people.
- Monitor local aurora chaser groups on social media. They often share real-time sightings from specific, lesser-known locations that have been tested for minimal traffic and light pollution.
- Even within city limits, you can find pockets of darkness. The key is to get the direct dome of city light behind you and have an unobstructed view to the north. A low Kp aurora will appear as a greyish arc to the naked eye, but your camera will reveal its green hue.
ISO 1600 or 3200: How to Capture Auroras Without Grainy Noise?
The eternal question for the night photographer is how to balance capturing enough light with managing digital noise. Pushing your ISO to 3200 or 6400 seems like the obvious answer to a dark scene, but it’s a trade-off that often results in a grainy, low-quality image. The goal isn’t just to make the aurora visible, but to capture its texture and detail. This requires a more delicate touch and an understanding of the signal-to-noise ratio. Your “signal” is the light from the aurora; your “noise” is the grain introduced by a high ISO and thermal interference.
As a starting point, NASA photographers advise setting your aperture as wide as possible (e.g., f/1.8 to f/2.8) to let in the maximum amount of light. This allows you to use a lower ISO and a faster shutter speed. For fast-moving auroras with distinct pillars and curtains, a shorter shutter speed (1-5 seconds) is crucial to freeze the motion and retain detail. For slow, faint arcs, you can afford a longer exposure (10-15 seconds). The ISO should be the last variable you adjust. Start at a moderate level like ISO 1600 and only increase it if the image is still too dark after optimizing your aperture and shutter speed.
The following table, based on extensive field testing by professional photographers, provides an excellent baseline for your settings. As noted in a guide by Dave Morrow Photography, these are starting points to be adjusted based on real-time conditions.
| Aurora Activity | Recommended ISO | Shutter Speed | Expected Result |
|---|---|---|---|
| Fast-moving, bright (Kp 5+) | 500-1000 | 1-5 seconds | Sharp details, minimal noise |
| Moderate movement (Kp 3-4) | 1000-1600 | 5-10 seconds | Good detail, acceptable noise |
| Faint, slow (Kp 1-2) | 1600-2000 | 10-15 seconds | Visible aurora, some noise |
Here’s the counter-intuitive advantage for Alberta photographers: the extreme cold. While it’s a challenge for us, it’s a benefit for our gear. Digital noise has two main components: read noise (from high ISO) and thermal noise. The intense cold of an Alberta winter night at -30°C naturally cools your camera’s sensor, significantly reducing thermal noise during a long exposure. Your camera will literally produce cleaner images in the deep freeze than on a mild autumn evening.
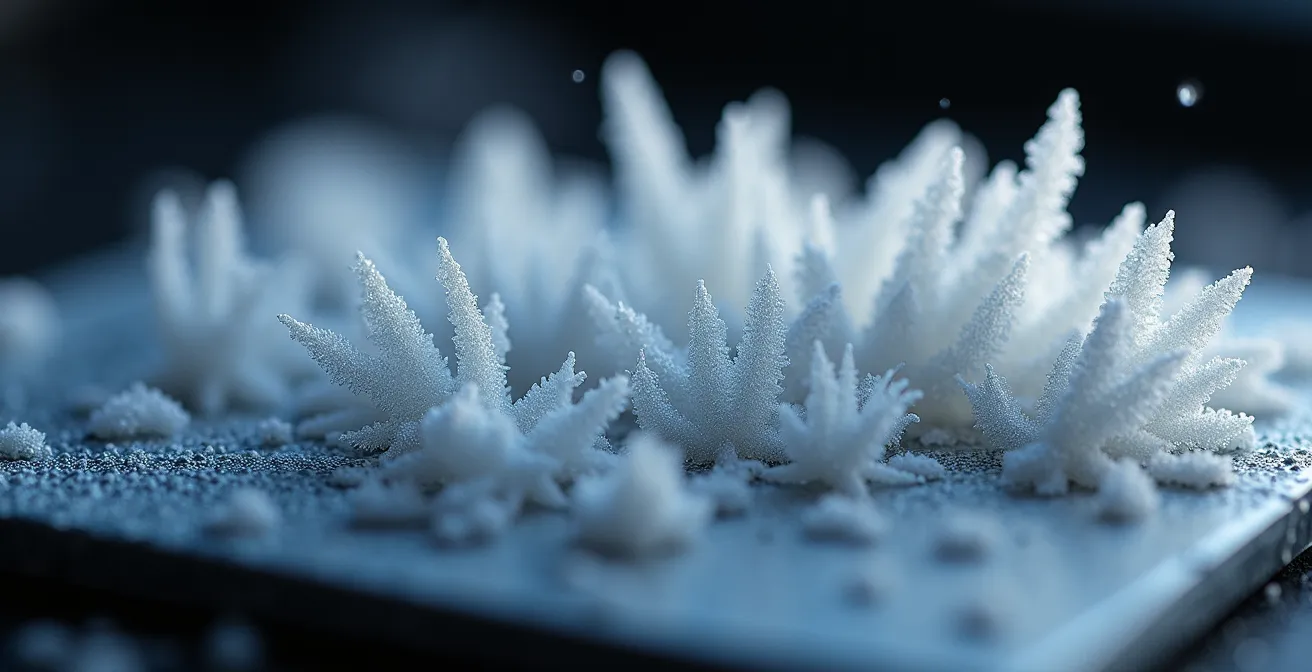
This “cryo-cooling” effect, as seen in the delicate frost forming on internal components, means you can often push your exposure time a little longer without paying the usual noise penalty, capturing more light and color with superior quality. It’s a perfect example of turning Alberta’s harshest condition into a photographic advantage.
Elk Island or Jasper: Which Dark Sky Preserve Offers Better Foreground Views?
When it comes to designated Dark Sky Preserves in Alberta, Elk Island National Park (part of the Beaver Hills preserve) and Jasper National Park are the two most recommended spots. The choice, however, isn’t just about darkness; it’s about foreground composition and the type of experience you seek. A great aurora photo isn’t just a picture of the sky; it’s a landscape photograph where the aurora is the main event. Your foreground—be it a mountain, a frozen lake, or a silhouette of trees—is what gives the image context and scale.
Elk Island’s primary advantage is its proximity to Edmonton, making it highly accessible. Its classic foregrounds are the still waters of Astotin Lake reflecting the sky or the iconic silhouettes of aspen parkland. However, this accessibility is also its biggest drawback. The park has become a victim of its own success. According to the Royal Astronomical Society of Canada (RASC), the area can attract up to two thousand visitors for stargazing events, and park authorities have recently implemented new closures in popular areas due to overcrowding, noise, and safety concerns. For the solitude-seeking photographer, Elk Island on a high-activity night can be counterproductive, a high “crowd noise” environment.
Jasper, on the other hand, offers an entirely different proposition. The drive is significantly longer, but the reward is a landscape of unparalleled grandeur. The foreground opportunities are world-class: the iconic shape of Pyramid Mountain, the vast expanse of Medicine Lake, or the frozen waterfalls of Maligne Canyon. The sheer scale of the mountains dwarfs any potential crowds, making it easier to find a unique, isolated composition. The trade-off is logistical—it requires a dedicated trip and more planning. For a photographer serious about creating a truly epic image, the dramatic mountain foregrounds of Jasper are often worth the extra effort.
Standing Still at -30°C: The Boots You Need to Wait for the Lights?
The most underestimated challenge of aurora photography in Alberta is not technical, but physiological: the brutal, creeping cold. You aren’t hiking; you are standing still for hours, a completely different thermal challenge. Your body generates almost no heat, and the frozen ground actively leeches warmth from your feet. Managing your patience threshold starts from the ground up. The right boots are not a luxury; they are the single most important piece of gear determining whether you go home after 30 minutes or stay out for the four hours needed to capture the peak display.
Forget your high-end hiking or snowboarding boots. They are designed for activity. For the static art of aurora watching, you need a specific type of footwear: -40°C rated PAC boots. The “PAC” refers to the construction, which typically involves a waterproof rubber lower, a leather or nylon upper, and—most importantly—a thick, removable felt liner. This liner is the key; it traps a massive amount of air, which is the ultimate insulator. The temperature rating (e.g., -40°C or even -100°C) isn’t about how warm you’ll be while walking. It’s a static rating, designed specifically for low-activity situations like ice fishing or, in our case, standing under the stars.
However, even the best boots will fail if you neglect one critical detail: ground contact. The relentless cold of the snow-packed earth will conduct heat away from your soles faster than any insulation can trap it. The solution is simple but profoundly effective: bring a small piece of closed-cell foam pad to stand on. This inexpensive item, like a small piece of a camping sleeping mat, creates a thermal break between your boots and the ground. The difference it makes over several hours is astonishing. It’s the secret weapon that allows seasoned hunters to remain comfortable while others retreat to their running cars.
Camera Sensor vs Human Eye: Why Do the Lights Look Greener on Your Screen?
One of the first things a new aurora chaser notices is the dramatic difference between what they see with their eyes and what appears on their camera’s display. To the naked eye, a faint aurora might appear as a soft, milky-grey arc, almost like a thin cloud. Yet, the photo reveals a vibrant green ribbon dancing across the sky. This isn’t a camera malfunction; it’s a fundamental difference in how our biological eyes and digital sensors perceive color in low light.
Our eyes have two types of photoreceptor cells: cones and rods. Cones are responsible for color vision but require a lot of light to function. Rods are incredibly sensitive to low light levels but see largely in monochrome. On a dark night, your cones are mostly inactive, and your vision relies on the rods. This is why you perceive the faint aurora in shades of grey. A digital camera sensor, however, doesn’t have this limitation. During a long exposure of several seconds, it can accumulate photons, patiently building up color information that is too faint for your eyes to register in real-time. As a NASA guide to aurora photography explains, a digital sensor is so sensitive it can often record auroras that are completely invisible to the naked eye. The dominant green and sometimes pink hues are produced by specific atoms—green from oxygen at lower altitudes and red/pink from nitrogen—which the sensor faithfully records.
This technical explanation, however, only tells one side of the story. For the Indigenous peoples who have watched these lights for millennia, the experience is not one of atomic physics but of deep spiritual connection. As noted by Road Trip Alberta, this perspective offers a profound contrast:
For the Cree, a significant Indigenous nation in northern Alberta, the translation from their language means the spirits are dancing.
– Road Trip Alberta, Northern Lights cultural significance in Alberta
This reminds us that while the camera reveals a physical reality our eyes cannot, the human experience holds a cultural and spiritual truth that the camera can never fully capture. The lights are both a scientific phenomenon and a sacred dance.
Morning or Afternoon: When is the Best Light on the Athabasca Glacier?
While the question of the best light on the Athabasca Glacier is a classic debate among daytime landscape photographers, for an aurora hunter, the concept of “best light” is turned on its head. Our canvas is the night, and our light source is a celestial phenomenon governed by solar winds, not the sun’s angle. The relevant question for us becomes: when during the long Alberta night is the auroral light at its peak? Is it in the early evening, or in the deep, cold hours before dawn?
Experience and data show that auroral activity is not constant throughout the night. While a display can begin as soon as darkness falls (around 6 or 7 PM in the depths of winter), the most dynamic and intense part of the show often occurs during what’s known as the auroral substorm. This is a dramatic brightening and rapid movement of the aurora, and it typically peaks in the hours around magnetic midnight. In Alberta, this corresponds roughly to the window between 10 PM and 2 AM.
This is why patience is the ultimate virtue of the aurora chaser. It’s incredibly tempting to pack up and go home if the sky is quiet at 9 PM. But very often, the main act has yet to begin. The early evening might feature a faint, stable arc on the northern horizon. This is the prelude. Staying out through the cold, waiting for that peak window, is what separates those who see a faint glow from those who witness a sky truly on fire. Your “best light” is often found long after the casual observers have gone to bed, in the quietest and darkest part of the night.
Base, Mid, Shell: What is the Correct Layering Sequence for Rockies Hiking?
The three-layer system—base, mid, and shell—is the gold standard for staying comfortable and safe while hiking in the Canadian Rockies. What many don’t realize is that this exact same principle is even more critical for the static, freezing work of aurora photography. In fact, it’s the only system that works. Dressing correctly isn’t about wearing one big, bulky jacket; it’s about creating a versatile micro-climate that you can manage throughout the night.
Let’s break down the system and adapt it for the hunter. Each layer has a distinct, non-negotiable job:
- The Base Layer: Moisture Management. This is the layer directly against your skin. Its only job is to wick sweat away from your body to keep you dry. Even standing still, you can generate slight perspiration, which can quickly chill you. Choose a snug-fitting top and bottom made of merino wool or a synthetic material like polyester. Cotton is your worst enemy; it absorbs moisture and will make you dangerously cold.
- The Mid-Layer: Insulation. This is your furnace. Its job is to trap your body heat. This is where you adapt the system for standing still versus hiking. For a static activity, you need more insulation. Think thick fleece jackets, down-filled vests, or a puffy synthetic insulated jacket. You can even wear two mid-layers if temperatures plummet. This is the layer you might partially unzip or remove in a warm car before stepping back out into the cold.
- The Shell Layer: Weather Protection. This outermost layer is your shield against the elements. Its primary job is to block the wind, which is the biggest thief of warmth on an open prairie or frozen lake. A good shell should be windproof and, ideally, waterproof or highly water-resistant to shed any falling snow. It doesn’t need to be insulated itself; its job is to protect the insulating layers beneath it.
By using this system, you can add or remove layers as your activity level changes (e.g., setting up gear vs. waiting). It’s a proven strategy taken directly from the mountaineer’s playbook and applied to the unique challenge of the patient aurora photographer.
Key Takeaways
- Success in aurora photography comes from exploiting low-Kp nights for solitude, not chasing crowded Kp-5 events.
- Embrace Alberta’s -30°C temperatures as a tool; the cold reduces camera sensor noise, leading to cleaner long-exposure images.
- Your most critical gear isn’t your lens, but your -40°C rated PAC boots and layering system, which directly determine your “patience threshold.”
Standing Still at -30°C: The Boots You Need to Wait for the Lights?
We’ve established that the right boots are the foundation for surviving a night of aurora hunting. But footwear alone is not enough. To truly master your environment and extend your patience threshold from minutes to hours, you must think of your warmth as a complete, managed system. It’s an ecosystem of gear and strategy designed to combat the relentless, passive cold you experience when standing perfectly still under a dark Alberta sky.
This system goes beyond just clothing. It’s about actively managing heat loss and generating internal warmth. It involves creating a barrier from the frozen ground, using chemical heat sources strategically, and fueling your body correctly. The goal is to remain not just safe, but comfortable enough to focus on your composition and camera settings without being distracted by shivering. A successful night is one where your decision to go home is based on the aurora fading, not because you can no longer feel your fingers.
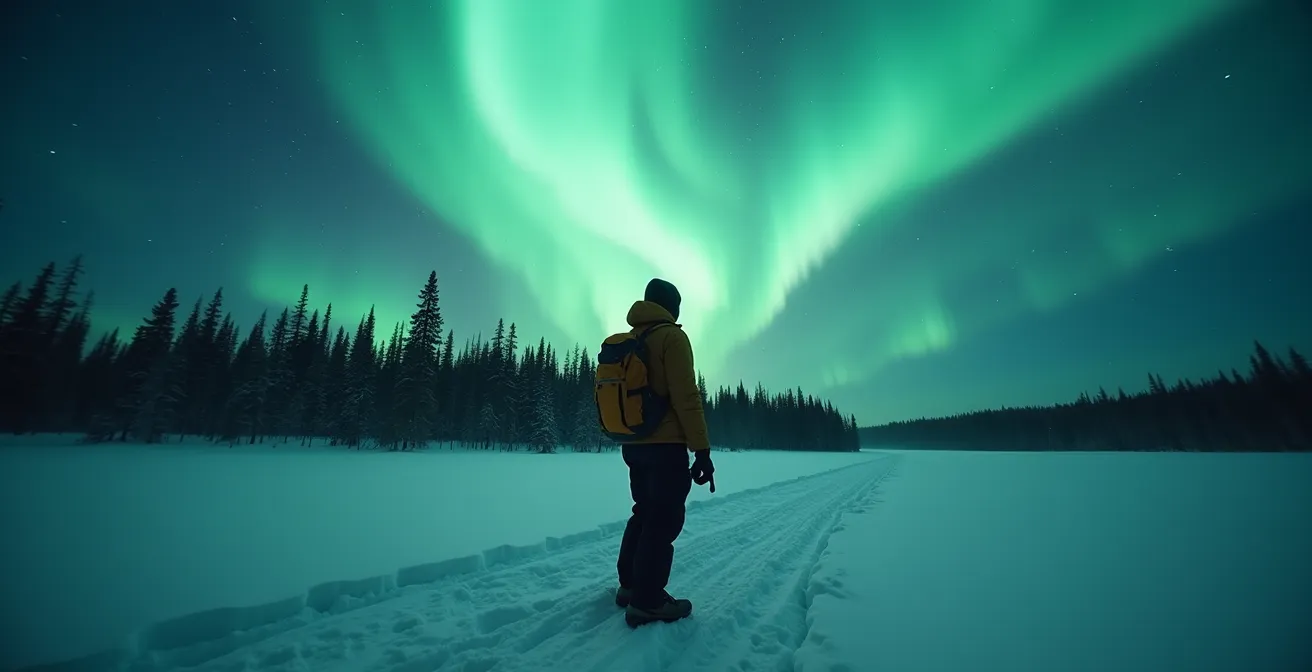
The silhouette of a prepared photographer against the aurora is a testament to this system. They are a self-contained unit, protected from the elements and able to wait as long as it takes. The following checklist outlines the essential components of this complete cold-weather survival system.
Your Action Plan: The Complete Aurora Hunter’s Warmth System
- Body Warmers: Apply large chemical body warmers to your core (lower back, abdomen) under your mid-layer, not just small warmers in your hands.
- Ground Insulation: Always stand on a closed-cell foam pad to create a thermal break from the snow and frozen ground.
- Internal Fuel: Bring a thermos of hot, savory soup or broth. It provides more sustained warmth and calories than sugary coffee or hot chocolate.
- Battery Management: Keep spare camera and phone batteries inside an inner pocket close to your body. The cold can drain them in minutes.
- Vehicle Strategy: Plan for short, disciplined warm-up breaks in your vehicle. Run the engine just long enough to warm the cabin, avoiding excessive idling that drains the battery and creates light pollution.
Now that you are equipped with the strategies for forecasting, shooting, and surviving, the final step is to put it all into practice. The sky is waiting.